Table of content:
- Setting up ReShade & configuration
- Explaining depth detection, Depth of Field (DoF), Fog effect & Screenspace RayTracing Global Illumination (RTGI)
- Other commonly used shaders (updated 29/9/2021)
- Random Tips ◀ you are here (added 20/9/2021)
Aside from some personal tips, this article also list out some capabilities of COM3D2 scene creation & plugin capabilities in case you aren't familiar with them already.
But first, what are the limitations of scene creation in COM3D2?
▶ Vanilla "Studio Mode" only supports up to 12 maid maximum. If you need more, you will need to use alternative studio mode like MPS (Maid Photo Studio). However, MPS have almost no UI aid, but require uses of various keyboard combo key to perform various action. If you felt intimidated, vanilla "Studio Mode" is still very powerful and have all the features you need.
▶ Summoning a lot of maid will cause the game's memory consumption to rise exponentially. For example having 12 maid on screen at once in Studio Mode, the game consume up to 25GB of memory! If you don't have enough system memory, the game will simply crash. But we can work around this issue by increasing "Virtual Memory", which is a way to use storage devices as temporary RAM. You can find various simple guide online on how to do so.
▶ Again, if you uses ReShade, the "screenshot scaling" function won't be usable for you.
▶ The gizmo (UI aid that allows you to position & rotate objects) will likely break when you change the game's FoV away from 35° degree. If you uses custom FoV for your scene, you may need to constantly reset your camera FoV to be able to use the gizmo correctly.
The Interface
There are many many panels with different functionalities including vanilla Studio Mode functionalities and those added by plugins. Don't get intimidated, there are quite many of them...
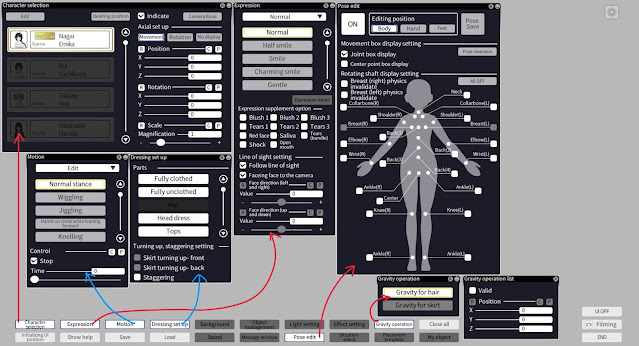
- Character Selection : spawn or de-spawn characters, gizmo to adjust position, rotation and size of character are here as well. The "indicate" checkbox will show or hide the character, "No display" refer to hiding the movement / rotation gizmo. "Deleting Position" is de-spawn.
- Expression : adjust facial features, clicking on "expression details" will open up additional sliders
- Motion : select poses. In most cases you want to hit the "stop" checkbox so they aren't animated when taking fixed screenshot. You don't need to install a billion static poses, just pick one from the vanilla list which similar with what you want to do, then do further adjustments in Pose Edit.
- Dressing Set Up : can undress equipped items, but you can't change equipped item here
- Pose Edit : adjust every bones on the selected character. Click the big "ON" button to start using this function. Clicking each of the checkboxes will show gizmo to adjust that specific bone / body part. Finger and toe adjustment are on a different page, switch page at the three buttons above.
- Gravity Control : very basic and simple gravity control to adjust position of hair and skirt. For your adjustment to take effect, tick the "valid" button.
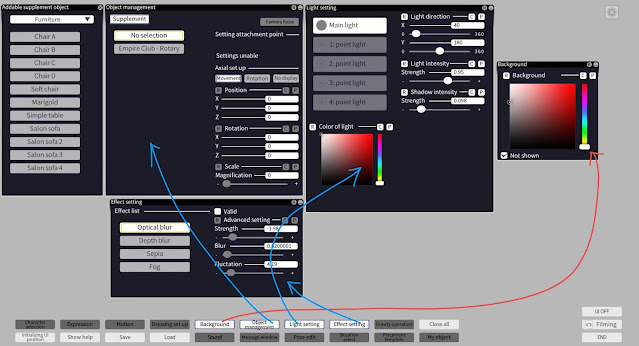
- Background : change background type or completely hide background, and pick a solid color instead.
- Object Management : spawn various vanilla objects, modded items in most cases will not appear here except very few. Clicking on the "Supplement" button will open a list at the left to pick new items to place into the environment.
- Light Setting : adjust color, strength and shadow of main lighting, as well as spawning 4 additional light points.
- Effect Setting : some very basic post process effect. In most cases we don't use this. Instead there are better alternatives such as SceneCapture or ReShade.
Save & Load : saving a scene in Studio Mode do NOT save objects or adjustments done by plugins such as SceneCapture. For things added or adjusted by plugins, make sure to also make saves on those plugins individually.
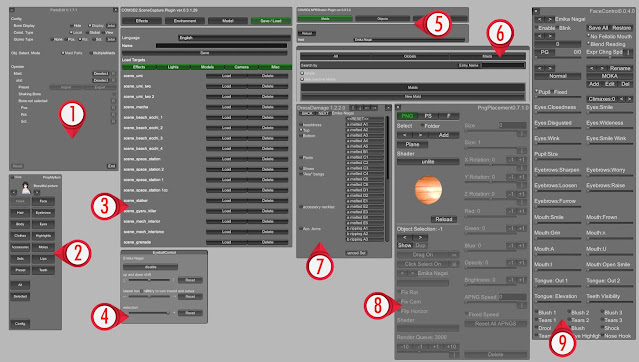
- PartsEdit ( gear menu ) : this plugin allows adjustment of every "bone" manually. Also able to adjust items spawned by SceneCapture, not just items equipped on maid. More usage detail in a section down below.
- PropMyItem ( Alt+Shift+I ) : this plugin allow changes of item equipped on maid on the fly. Basically a mini maid edit except you cannot alter body & head sliders, but only change items. Note: this plugin take a while to load.
- SceneCapture ( gear menu / configure with shortcut ) : a vastly useful plugin. The "effects" tab consist of various post process effects, the "environment" tab contain camera adjustment and saving camera position aside from additional lighting control. The "model" tab is where we spawn any objects in the game. The "Save/Load" tab is saving changes made by SceneCapture into presets.
- Eyeball Control ( F10 ) : in vanilla Studio Mode there is no function to adjust eyeball position left/right up/down, this plugin does that.
- NPR Shader ( gear menu ) : we came here to hit the "refresh" button in case we spawned new NPR objects into the scene so they render correctly.
- Shapkey Master ( gear menu ) : adjust shapekeys on maid body & face. This is a better plugin than ShapeAnimator, aside from better UI to manage large amount of maids, also better performance & better sorted shapekey list.
- Dress Damage ( gear menu ) : apply various torn / melt effect onto clothing.
- PNG Placement ( P key ) : add & adjust PNG images into scene. More usage detail in a section down below.
- FaceControl ( F9 ) : while this is vary similar to the vanilla expression control function, this plugin also allow to save adjustment into preset to quickly re-use later. And more importantly - stop maid from blinking. The interface buttons might be a little confusing... use the Add/Edit/Delete & Rename button at the right side to manage presets.
In case you didn't installed some of these plugins when installing CMI, you can also manually installing them by look them up on Github for their DLL plugin files.
Useful asset mods for scene creation
▶ Single Color Background https://twitter.com/nondakurenomisu/status/1370307948858077186 : we can already hide background in COM3D2 but why do we need this? An empty space cannot have shadow casted on it, that's why you need this asset if you want shadow to be casted on the ground.
▶ Water Bed https://ux.getuploader.com/Neerhom_mod/download/15 : no, this isn't THAT bed. These are actually water surfaces. You find these under Studio Mode's "Object Management" panel as these are not equipable accessory items.
Random Tips
▶ you can find many photo composition / framing technique online. Among the most general ones are "rule of third" or where you should place your subject on the shot; method to simplify your scene so the focus is placed on your subjects, such as using DoF to blur out background; also plays with your camera position and angle to find a more interesting perspective - human eye levels are often really boring especially when you try to capture a scene of motion or action... https://www.photographymad.com/pages/view/10-top-photography-composition-rules
▶ shadow, don't forget the shadow in your scene. Unless you making a photo studio character portrait photoshoot, you likely want shadow in your scene. The default lighting's shadow intensity in Studio Mode was set very low, will want to crank that up.
▶ SceneCapture shortcut keys are disabled by default for whatever reason in latest CMI, set them in \COM3D2\Sybaris\UnityInjector\Config\SceneCapture.ini -- UseKeyboad=True, EffectWindowKey=x, EnvironmentWindowKey=c, DataWindowKey=v
▶ during scene creation, sometime it is actually better to spawn the accessories you want to wear/equip on a maid with SceneCapture - this way you can have higher degree of freedom on manipulating that accessories than what you can originally do in maid edit.
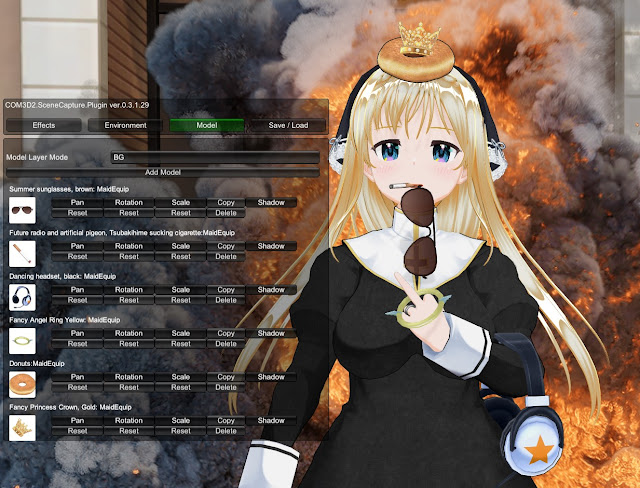 |
| You get the idea... Just don't forget to save SceneCapture preset. |
▶ default shortcut key for CameraControlEx uses numpad to control camera, would be way easier if just use the generic WASD & RF to up & down. Set them in \COM3D2\Sybaris\UnityInjector\Config\CameraControlExPlugin.ini Latest version of CameraControlEX from CMI 2.5.6 is now a BepinEX plugin, the buttons can be adjusted while in game in the F1 setting menu.
▶ some of the mod/plugin user interface are in Japanese language, untranslated. If you want to translate them with the autoTranslator plugin, go to - COM3D2\BepinEx\config, open the AutoTranslatorConfig.ini and change EnableIMGUI=True
▶ post process in image editor is inevitable, especially if you intend to fix the low polygon problems especially on hairs. To make fixing low polygon problem easier, I suggest not to use bloom & chromatic aberration effects in your shot. Anything that make edges more complicated will make fixing harder; instead, apply bloom & CA after you done fixing in image editor manually. Picture below explain how to fix low polygon corners, in most cases I just use small 1-pixel to 3 pixel sized brush with 90 to 95% hardness to do so.
▶ "dude I don't have $$$ for Photoshop!"; don't worry, just use https://www.photopea.com/ it function 99% like Photoshop, even the interface is extremely similar - any Photoshop tutorial you found online likely can be applied in Photopea.
With the exception that Photopea possibly unable to do the "Alt" key operation due to browser limitation. What does the "Alt" key do? They allow you to alternate operation of the tools you currently using, for example when you using a brush in Photoshop, you can hold Alt to quickly sample a new color (color picker tool) without the need of switching to the actual color picker tool. In Photopea you just gotta use the "I" key to switch to color picker, then "B" key to back to brushing.
The other operation you will be constantly using is right clicking while using a tool - while using a brush tool, this will allow you to quickly change the brush size and hardness.
▶ for summary of above operation : set your brush size to small pixel size and high hardness (eg: 2px, 95% hardness) -- pick a color you want to paint by sampling the picture with color picker -- hold shift and left click two points around the low polygon corner to draw a straight line.
▶ Note : sometime you cannot use a brush to paint solid color, instead you will want to use the "Clone Stamp" tool to copy the exact pattern from another spot. On Photopea, you pick/sample the spot you want to copy by holding the "K" key instead of "Alt" key while using Clone Stamp tool.
▶ Clipping or bad polygon behaviour happens. Don't bother try to make it absolute perfect in the game, sometime it just plain impossible. Just make it good enough and then fix the rest in image editor.
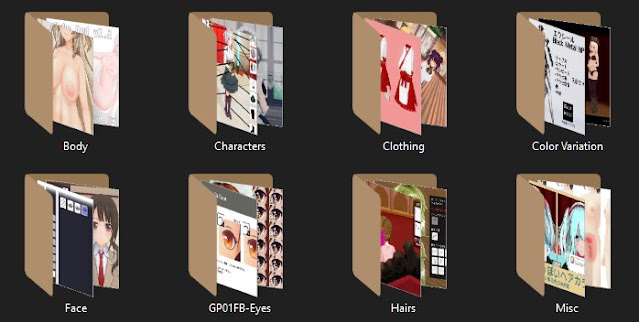
▶ this tip have nothing to do with scene creation, but rather managing your mod. Make a habit of creating subfolders in COM3D2/mods/ folder by categories and sort your mods in there. And then make sure every mod have a JPG picture and name it "folder.jpg" (PNG will not works). This will create consistent thumbnail allows you to browse your folder much easily. A lot of mod author package their mod with PNG instead of JPG, there is a very quick way to do file conversion instead of using specific software, with this tool : File Converter / direct link to Github release.
▶ remember the Display Depth shader? Actually these are more uses of these black & white imagery even outside the game. Take a screenshot of this black & white imagery and you can do some interesting things in image editor, for example apply manual Depth of Field - because with this imagery, the software can understand what object is in-front and what is behind. Aside from that, you can also use it as "masking" for a lot of tasks. The example below uses the Depth Map to add texts BEHIND the character. "Masking" is an important concept & and skill in image editing, I believe this is much easily explained with video tutorials instead, so go onto Youtube and look for tutorial about masking for example this one.
Without depth map to quickly & easily select individual objects or part of the image, it will be quite pain-in-the-ass & waste of time to manually selecting object with selection tools...
▶ to get a completely solid white background for getting a cleaner Depth Map with only your subjects, simply hide the background scenery.
PartsEdit
This plugin can be accessed through the gear-icon at top right corner.
- "Gizmo Type" : switch between changing position of bone, or rotate then, or scale their size
- "Obj. Select. Mode" : switch between managing object equipped on maids with the "Maid Parts" option. Or switch to managing objects / props spawned by other methods such as SceneCapture by ticking the "MultipleMaids" option.
- "Maid" : pick your maid
- "slot" : select the item you want to maange
- "Preset" : you can export edited item. But the game/mod will not load it automatically next time, you need to import manually every time you come back to scene creation.
- "Shaking Bone" : you need to DISABLE this to actually adjust the bones on items.
- various [R] buttons : these are the reset buttons
After you pick an item to edit, you will see there are a lot of white lines appear on the object. These are the bones. But clicking on them will actually do nothing - you actually need to HOLD ALT when clicking on them to select - then they will turn red - now you can edit this bone.
If your camera isn't the default 35° degree FoV, that will break the gizmo and very hard to click onto. So, make sure to reset your camera FoV when using this plugin.
You will also see a ▯ button on the top-left corner, you can use it to resize the plugin window. The Import panel often get's winder than usual and things get clipped off to the right.
When importing previously exported bone adjustment, tick the "same name" button first, so you don't need to go through a list of billions of unrelated items.
Deselect object / maid by clicking on the "Maid" or "slot" and pick "Deselect" to hide bone displays. Or you can use the "Bone Display" option at the top.
PNG Placements

- the "PNG" tab is where we will do most of our works. And the "F" tab is where you save & load your preset. Make sure to save! The game don't save it for you automatically! The "PS" tab is to turn the PNG into some kind of animated particle effect, though your image must be a small picture such as below 250 x 250 pixels. Larger PNG will not be available in the PS tab.
- use these < > arrows buttons to navigate to PNG image you want to place and hit the "Add" button
- use these < > arrows to navigate to the already placed PNG images in your scene, you can also hide it or hit the "Dup" button to make a duplicate.
- while you can use the "Drag On" button to toggle a "ball" in the middle of the PNG image so you can drag it around your scene, or hit the ⇔ button beside it to show some positioning tools, this method may not be the most ideal way to move your placed PNG sometime. Clicking on the "Click Select On" allow you to select the placed PNG by clicking it on your scene. It also shows a boundary edge so you can use this to tell where is the placed PNG in case you lost it. But the most important tool here is actually on the ※ button we well explain further later.
- normally you would want to click the "Fix Rot" button so it's rotation isn't bound to your camera view.
- changing the shader will change how the in-game lighting affect the PNG image. "unlite" means it always display like the real picture with no shading. If you want the game's lighting to affect the image, change to "lite".
- these are the various sliders you can use to scale, rotate, adjust color of the image
- reload PNG, this will also scan for new images you added in the folder. The location where you want to place your images is - COM3D2\Sybaris\UnityInjector\Config\PngPlacement - you might want to pin this to Windows' Quick Access or shortcut it somewhere for easy access.
- the delete button
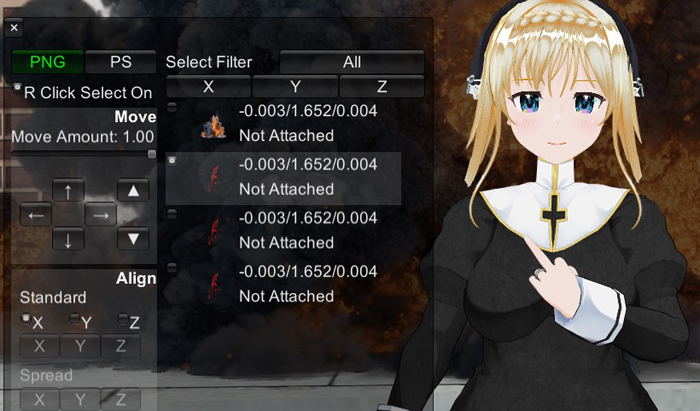
This extra panel is accessed by hitting the ※ button. This is the method I primarily uses to move PNG images around the scene as it is faster than the ⇔ buttons on the original page.
Notice that on this page, images aren't deselected automatically when you pick another image. If you want to move a different item, make sure to deselect the other ones first. But this also means, you can select multiple images and move them at the same time.
The "Move Amount" slider control the speed of movement. Then use the arrow buttons on the interface to move the images around the scene. Do note that, these arrow buttons correspond to the WORLD's position, not your camera position. What that means is, clicking on going left, will go left of the WORLD; not the left of your camera... This may get a little confusing if your camera position isn't pointing to the default direction.
Finding PNG images
You can simply just add "PNG" on your search parameter and Google / whatever search engine will give you PNG images with transparent background.
The way you can tell if the background is truly transparent is, when the image finish loading it will show checker-board pattern behind. However, if you see checker-board on the small thumbnail, it's FAKE BAIT and don't bother with it.
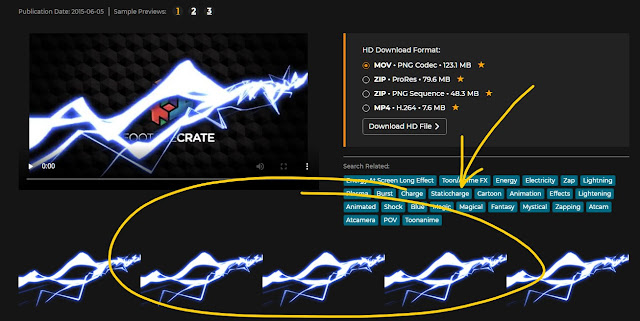
Here is a website I find to have some interesting images you can use. Technically they sell animated visual effects, but you can find tons of PNG static images you can use here https://vfx.productioncrate.com/ .
At the bottom of the detail page you will find the static PNGs you can use.
LUT LUT LUT LUT
Yes, COM3D2's vanilla graphic visual may not be the best, often looks quite 'rigid'. That's why we want to use LUT (Look up Table) to give our shots some color filters.
If you just making a "studio style" photoshoot you likely won't need a LUT, in most cases a boost in Vibrance is enough. But if you making some very unusual shots not original intended by the game, you likely find yourself in a situation where the color of things just looks like utter crap.
In previous article I already walk through method of creating your own LUT collection, as well as linking to my own set of ReShade LUT collection.
In the scene above. The first image is the original poses and prop placed by SceneCapture. Second shot shows the original color without any adjustment and LUT - the color is really all over the place.
The last shot shows the usage of LUT, instantly transform the mood of the scene into something else more fitting of the scene.
Normally, if I need a LUT for the scene, the process is as follow:
- make some basic poses and object placement for the scene, don't need to be accurate yet
- find & save a suitable camera position for the scene
- find a suitable LUT for the scene, don't worry if there are some minor dissatisfaction with certain color
- use qUINT Lightroom to further fixes some specific color problem. Let say if you don't want the blue color in your scene, you can completely eliminate blue color with the sliders under "Palette" section of the shader.
- The "Palette" section contain sliders for specific color ranges. You can change these color in your scene if you don't like how they looks originally. "Hue" will swap the color with a different color tone. "Exposure" is the brightness of it. "Saturation" is pretty self explanatory.
- The "curves" section have various individual controls for the bright spot and dark spot of your scene. For example, if you find the black area of your scene are too black and you cannot see the details, you can try raise the "Black Curves" or "Shadow Curves".
- The "Color & Saturation" section is quite self explanatory. You can also change the temperature, colder or warmer, or add color tint to your scene.
- The "Vignette" section give you various sliders to adjust the size and vignette intensity for your scene.
//--
Table of content:
- Setting up ReShade & configuration
- Explaining depth detection, Depth of Field (DoF), Fog effect & Screenspace RayTracing Global Illumination (RTGI)
- Other commonly used shaders (updated 29/9/2021)
- Random Tips ◀ you are here (added 20/9/2021)


