• Asset Release : Hotel Neptuno Triton

  • Release : Museum of the Revolution

  • Release : Union Terminal

Wednesday, February 8, 2023

Two amazingly simple and practical Windows Explorer customization tool, no system theme hacks.

Ever browse the internet or DeviantArt in search for Windows theme, tried a few of them, and ultimately decided that there just something you don't like about them, maybe just that one button that you wish they stayed vanilla, or just the color is slightly off... etc.

Yep. That's basically how I feels about themes. Every time they just got uninstalled after 15 minutes.

Recently when I looked around for method of placing background images onto Explorer, I came across this simple yet AMAZING tool: 

Explorer Tool (background image)

https://github.com/Maplespe/explorerTool

It's so dead simple, just a matter of prepare your images, dump it into the designated folder, configure the position in the config file and install it. Done, even randomize between multiple images every time you change folder! Works in both Windows 10 and 11.


Explorer Blur Mica

There's one more simple yet amazing tool from the same author - absolute easy changes Explorer background COLOR and TRANSPARENCY. Works with both Windows 10 and 11 as well!

https://github.com/Maplespe/ExplorerBlurMica

Picture above shows both tool working at the same time, adding personalized PNG images to the background, and add a cool acrylic/mica transparency for the whole window. I set mine to black color as it's a more practical color, but you can set to any color and transparency level you like! Hot pink why not, if you want to destroy your eyes 🤣

The Only Glitch

There is one glitch however. No it's not related to what they do, but a compatibility problem with T-Clocks, a different tool that customize your taskbar clock with more information. I find that T-Clocks tend to become invisible when above Explorer tools active. So, it's unfortunate I have to remove T-Clocks.

Link to T-Clocks : https://github.com/White-Tiger/T-Clock


Tuesday, February 7, 2023

Better Zoom & Pan in Photoshop / InDesign with X-Mouse Button Control

If you ever worked with any 3D modelling software you will know the middle mouse button is an intuitive button to operate many camera operations, or navigating the world space.

But for whatever devil reason, Adobe do not implement middle mouse operation into their software.

Why?!

Just installed InDesign and instantly hit by how awful camera navigation control. I had been using X-Mouse Button Control for Photoshop for ages, instantly programmed a set for InDesign.


X-Mouse Button Control is a software that can override your mouse input for specific software, with a new set of input. For example in Photoshop, you need to press Space while holding left mouse button to pan. Why... Why... Why not just use the dang middle mouse button for that whole operation, just like a 3D modelling software did?!

Photoshop middle mouse pan & zoom


Add the software EXE, at the right side under "middle mouse", select "Simulated Keys" and hit the gear button at the right side of it to enter it's configuration window.

In the configuration window, what you want to insert in the "Enter the custom key" text box is sequences of keys to operate, in this case Space + Left Mouse Button. You don't need to type these manually, just hit the drop down menu marked (1) in picture above, and select from drop down list.

Then change the "How to send the simulated key stroke" to "3 During". And make sure the "Block original mouse input" checkbox is checked. You done. Save everything and you should be able to hold middle mouse button to pan in Photoshop!

Do you know that the key combo of Alt + Space + Left Mouse Button is for smooth zooming in Photoshop? Now that Space + LMB already simulated in Middle Mouse Button, you can actually hold Alt and hold your Middle Mouse Button for smooth instant zooming.................................

Summary : hold middle mouse to pan, ALT+hold middle mouse to zoom!

In Design mouse operation settings

For InDesign, currently I have 3 set of operation assigned, exactly the same method as Photoshop's configuration as above, just different key strokes. Refer picture below. 

- middle mouse for panning, same as photoshop's setting
- wheel up override with ALT + wheel up, so I don't need to hold alt to zoom.
- wheel down override with ALT+wheen down.

Since I panning with middle mouse already, I don't need to use the wheel to scroll the document.


//--

Of course you can also apply the same stuff to any other software that you find haveing weird unintuitive mouse control.

Sunday, January 30, 2022

Commissioning Cities Skylines Asset

If you not being redirected to Google Form automatically, please click the following link:


https://docs.google.com/forms/d/e/1FAIpQLSeFuCr5qCjKL3YG99b1EWYb_CJIWuz0bW-r4CSqrRCADyU7tw/viewform

Please submit your request through the form.

---

My Steam Workshop:

---

Follow my asset creation progress at Patreon or Ko-Fi


Sunday, September 19, 2021

COM3D2 : Random Tips for Scene Creation

Table of content:

  1. Setting up ReShade & configuration 
  2. Explaining depth detection, Depth of Field (DoF), Fog effect & Screenspace RayTracing Global Illumination (RTGI)
  3. Other commonly used shaders (updated 29/9/2021)
  4. Random Tips ◀ you are here  (added 20/9/2021)
Got question? Shoot me a whisper/private message on Discord, username NameInvalid#3419 or KUZU ⩌.⩌ on Custom Maid Server.

Aside from some personal tips, this article also list out some capabilities of COM3D2 scene creation & plugin capabilities in case you aren't familiar with them already.


But first, what are the limitations of scene creation in COM3D2?

▶  Vanilla "Studio Mode" only supports up to 12 maid maximum. If you need more, you will need to use alternative studio mode like MPS (Maid Photo Studio). However, MPS have almost no UI aid, but require uses of various keyboard combo key to perform various action. If you felt intimidated, vanilla "Studio Mode" is still very powerful and have all the features you need.

▶  Summoning a lot of maid will cause the game's memory consumption to rise exponentially. For example having 12 maid on screen at once in Studio Mode, the game consume up to 25GB of memory! If you don't have enough system memory, the game will simply crash. But we can work around this issue by increasing "Virtual Memory", which is a way to use storage devices as temporary RAM. You can find various simple guide online on how to do so.

▶  Again, if you uses ReShade, the "screenshot scaling" function won't be usable for you.

▶  The gizmo (UI aid that allows you to position & rotate objects) will likely break when you change the game's FoV away from 35° degree. If you uses custom FoV for your scene, you may need to constantly reset your camera FoV to be able to use the gizmo correctly.


The Interface

There are many many panels with different functionalities including vanilla Studio Mode functionalities and those added by plugins. Don't get intimidated, there are quite many of them...
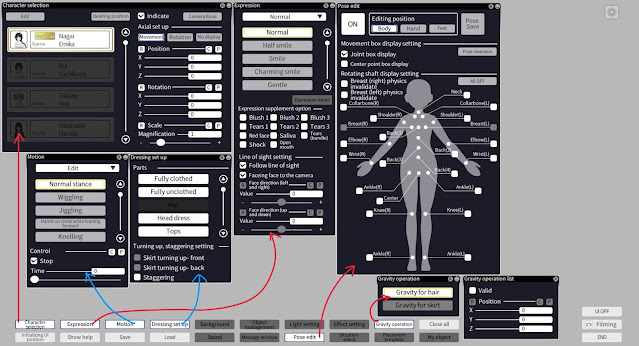

  • Character Selection : spawn or de-spawn characters, gizmo to adjust position, rotation and size of character are here as well. The "indicate" checkbox will show or hide the character, "No display" refer to hiding the movement / rotation gizmo. "Deleting Position" is de-spawn.
  • Expression : adjust facial features, clicking on "expression details" will open up additional sliders
  • Motion : select poses. In most cases you want to hit the "stop" checkbox so they aren't animated when taking fixed screenshot. You don't need to install a billion static poses, just pick one from the vanilla list which similar with what you want to do, then do further adjustments in Pose Edit.
  • Dressing Set Up : can undress equipped items, but you can't change equipped item here
  • Pose Edit : adjust every bones on the selected character. Click the big "ON" button to start using this function. Clicking each of the checkboxes will show gizmo to adjust that specific bone / body part. Finger and toe adjustment are on a different page, switch page at the three buttons above.
  • Gravity Control : very basic and simple gravity control to adjust position of hair and skirt. For your adjustment to take effect, tick the "valid" button.
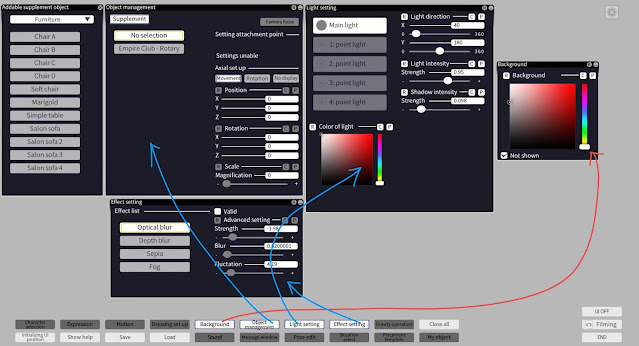

  • Background : change background type or completely hide background, and pick a solid color instead.
  • Object Management : spawn various vanilla objects, modded items in most cases will not appear here except very few. Clicking on the "Supplement" button will open a list at the left to pick new items to place into the environment.
  • Light Setting : adjust color, strength and shadow of main lighting, as well as spawning 4 additional light points.
  • Effect Setting : some very basic post process effect. In most cases we don't use this. Instead there are better alternatives such as SceneCapture or ReShade.

Save & Load : saving a scene in Studio Mode do NOT save objects or adjustments done by plugins such as SceneCapture. For things added or adjusted by plugins, make sure to also make saves on those plugins individually.
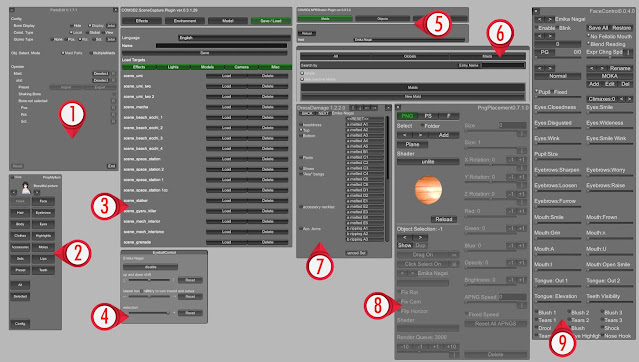

  1. PartsEdit ( gear menu ) : this plugin allows adjustment of every "bone" manually. Also able to adjust items spawned by SceneCapture, not just items equipped on maid. More usage detail in a section down below.
  2. PropMyItem ( Alt+Shift+I ) : this plugin allow changes of item equipped on maid on the fly. Basically a mini maid edit except you cannot alter body & head sliders, but only change items. Note: this plugin take a while to load.
  3. SceneCapture ( gear menu / configure with shortcut ) : a vastly useful plugin. The "effects" tab consist of various post process effects, the "environment" tab contain camera adjustment and saving camera position aside from additional lighting control. The "model" tab is where we spawn any objects in the game. The "Save/Load" tab is saving changes made by SceneCapture into presets.
  4. Eyeball Control ( F10 ) : in vanilla Studio Mode there is no function to adjust eyeball position left/right up/down, this plugin does that.
  5. NPR Shader ( gear menu ) : we came here to hit the "refresh" button in case we spawned new NPR objects into the scene so they render correctly.
  6. Shapkey Master ( gear menu ) : adjust shapekeys on maid body & face. This is a better plugin than ShapeAnimator, aside from better UI to manage large amount of maids, also better performance & better sorted shapekey list.
  7. Dress Damage ( gear menu ) : apply various torn / melt effect onto clothing.
  8. PNG Placement ( P key ) : add & adjust PNG images into scene. More usage detail in a section down below.
  9. FaceControl ( F9 ) : while this is vary similar to the vanilla expression control function, this plugin also allow to save adjustment into preset to quickly re-use later. And more importantly - stop maid from blinking. The interface buttons might be a little confusing... use the Add/Edit/Delete & Rename button at the right side to manage presets.

In case you didn't installed some of these plugins when installing CMI, you can also manually installing them by look them up on Github for their DLL plugin files.


Useful asset mods for scene creation

▶  Single Color Background https://twitter.com/nondakurenomisu/status/1370307948858077186 : we can already hide background in COM3D2 but why do we need this? An empty space cannot have shadow casted on it, that's why you need this asset if you want shadow to be casted on the ground.

▶  Water Bed https://ux.getuploader.com/Neerhom_mod/download/15 : no, this isn't THAT bed. These are actually water surfaces. You find these under Studio Mode's "Object Management" panel as these are not equipable accessory items.


Random Tips

▶  you can find many photo composition / framing technique online. Among the most general ones are "rule of third" or where you should place your subject on the shot; method to simplify your scene so the focus is placed on your subjects, such as using DoF to blur out background; also plays with your camera position and angle to find a more interesting perspective - human eye levels are often really boring especially when you try to capture a scene of motion or action... https://www.photographymad.com/pages/view/10-top-photography-composition-rules

▶  shadow, don't forget the shadow in your scene. Unless you making a photo studio character portrait photoshoot, you likely want shadow in your scene. The default lighting's shadow intensity in Studio Mode was set very low, will want to crank that up.

▶  SceneCapture shortcut keys are disabled by default for whatever reason in latest CMI, set them in \COM3D2\Sybaris\UnityInjector\Config\SceneCapture.ini -- UseKeyboad=True, EffectWindowKey=x, EnvironmentWindowKey=c, DataWindowKey=v

▶  during scene creation, sometime it is actually better to spawn the accessories you want to wear/equip on a maid with SceneCapture - this way you can have higher degree of freedom on manipulating that accessories than what you can originally do in maid edit.
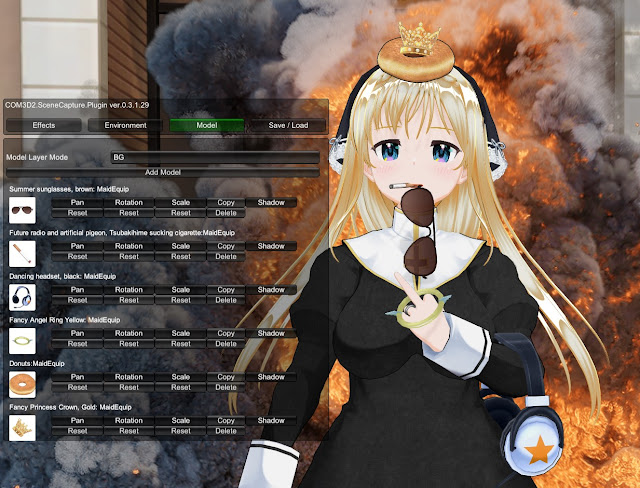
You get the idea... Just don't forget to save SceneCapture preset.

▶  default shortcut key for CameraControlEx uses numpad to control camera, would be way easier if just use the generic WASD & RF to up & down. Set them in \COM3D2\Sybaris\UnityInjector\Config\CameraControlExPlugin.ini Latest version of CameraControlEX from CMI 2.5.6 is now a BepinEX plugin, the buttons can be adjusted while in game in the F1 setting menu.

▶  some of the mod/plugin user interface are in Japanese language, untranslated. If you want to translate them with the autoTranslator plugin, go to - COM3D2\BepinEx\config, open the AutoTranslatorConfig.ini and change EnableIMGUI=True

▶  post process in image editor is inevitable, especially if you intend to fix the low polygon problems especially on hairs. To make fixing low polygon problem easier, I suggest not to use bloom & chromatic aberration effects in your shot. Anything that make edges more complicated will make fixing harder; instead, apply bloom & CA after you done fixing in image editor manually. Picture below explain how to fix low polygon corners, in most cases I just use small 1-pixel to 3 pixel sized brush with 90 to 95% hardness to do so. 


▶  "dude I don't have $$$ for Photoshop!"; don't worry, just use https://www.photopea.com/ it function 99% like Photoshop, even the interface is extremely similar - any Photoshop tutorial you found online likely can be applied in Photopea.

With the exception that Photopea possibly unable to do the "Alt" key operation due to browser limitation. What does the "Alt" key do? They allow you to alternate operation of the tools you currently using, for example when you using a brush in Photoshop, you can hold Alt to quickly sample a new color (color picker tool) without the need of switching to the actual color picker tool. In Photopea you just gotta use the "I" key to switch to color picker, then "B" key to back to brushing.

The other operation you will be constantly using is right clicking while using a tool - while using a brush tool, this will allow you to quickly change the brush size and hardness.

▶  for summary of above operation : set your brush size to small pixel size and high hardness (eg: 2px, 95% hardness) -- pick a color you want to paint by sampling the picture with color picker -- hold shift and left click two points around the low polygon corner to draw a straight line. 

▶  Note : sometime you cannot use a brush to paint solid color, instead you will want to use the "Clone Stamp" tool to copy the exact pattern from another spot. On Photopea, you pick/sample the spot you want to copy by holding the "K" key instead of "Alt" key while using Clone Stamp tool.

▶  Clipping or bad polygon behaviour happens. Don't bother try to make it absolute perfect in the game, sometime it just plain impossible. Just make it good enough and then fix the rest in image editor.

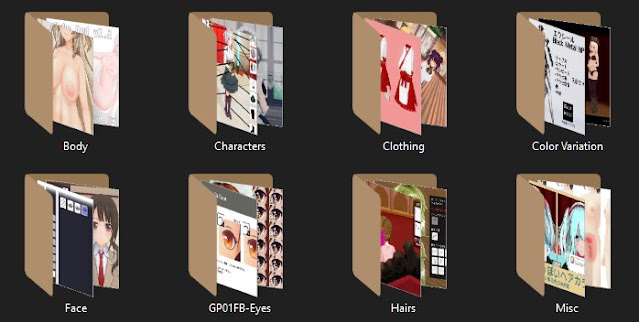
▶  this tip have nothing to do with scene creation, but rather managing your mod. Make a habit of creating subfolders in COM3D2/mods/ folder by categories and sort your mods in there. And then make sure every mod have a JPG picture and name it "folder.jpg" (PNG will not works). This will create consistent thumbnail allows you to browse your folder much easily. A lot of mod author package their mod with PNG instead of JPG, there is a very quick way to do file conversion instead of using specific software, with this tool : File Converter / direct link to Github release.

▶  remember the Display Depth shader? Actually these are more uses of these black & white imagery even outside the game. Take a screenshot of this black & white imagery and you can do some interesting things in image editor, for example apply manual Depth of Field - because with this imagery, the software can understand what object is in-front and what is behind. Aside from that, you can also use it as "masking" for a lot of tasks. The example below uses the Depth Map to add texts BEHIND the character. "Masking" is an important concept & and skill in image editing, I believe this is much easily explained with video tutorials instead, so go onto Youtube and look for tutorial about masking for example this one.

Without depth map to quickly & easily select individual objects or part of the image, it will be quite pain-in-the-ass & waste of time to manually selecting object with selection tools...

▶  to get a completely solid white background for getting a cleaner Depth Map with only your subjects, simply hide the background scenery.

PartsEdit

This plugin can be accessed through the gear-icon at top right corner.


  • "Gizmo Type" : switch between changing position of bone, or rotate then, or scale their size
  • "Obj. Select. Mode" : switch between managing object equipped on maids with the "Maid Parts" option. Or switch to managing objects / props spawned by other methods such as SceneCapture by ticking the "MultipleMaids" option.
  • "Maid" : pick your maid
  • "slot" : select the item you want to maange
  • "Preset" : you can export edited item. But the game/mod will not load it automatically next time, you need to import manually every time you come back to scene creation.
  • "Shaking Bone" : you need to DISABLE this to actually adjust the bones on items.
  • various [R] buttons : these are the reset buttons

After you pick an item to edit, you will see there are a lot of white lines appear on the object. These are the bones. But clicking on them will actually do nothing - you actually need to HOLD ALT when clicking on them to select - then they will turn red - now you can edit this bone.

If your camera isn't the default 35° degree FoV, that will break the gizmo and very hard to click onto. So, make sure to reset your camera FoV when using this plugin.

You will also see a ▯ button on the top-left corner, you can use it to resize the plugin window. The Import panel often get's winder than usual and things get clipped off to the right.


When importing previously exported bone adjustment, tick the "same name" button first, so you don't need to go through a list of billions of unrelated items.

Deselect object / maid by clicking on the "Maid" or "slot" and pick "Deselect" to hide bone displays. Or you can use the "Bone Display" option at the top.


PNG Placements

This plugin is activated by hitting the [P] key on keyboard.
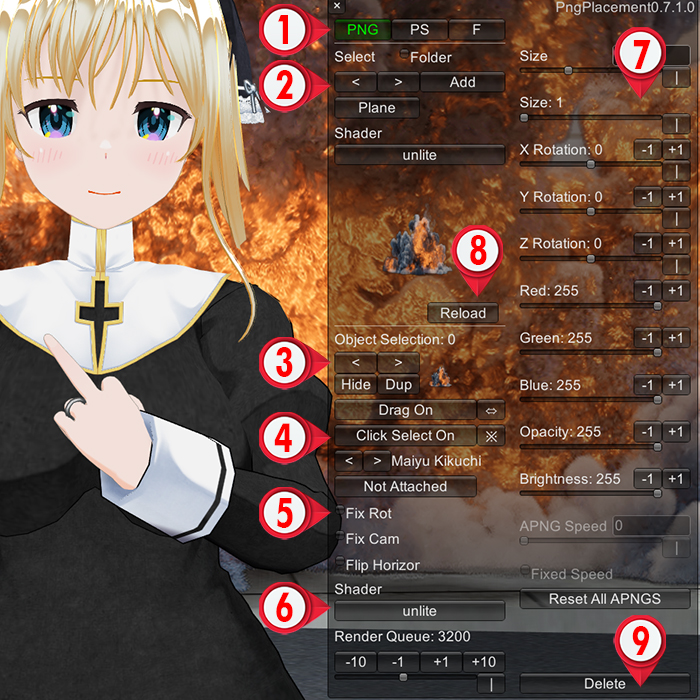
  1. the "PNG" tab is where we will do most of our works. And the "F" tab is where you save & load your preset. Make sure to save! The game don't save it for you automatically! The "PS" tab is to turn the PNG into some kind of animated particle effect, though your image must be a small picture such as below 250 x 250 pixels. Larger PNG will not be available in the PS tab.
  2. use these < > arrows buttons to navigate to PNG image you want to place and hit the "Add" button
  3. use these < > arrows to navigate to the already placed PNG images in your scene, you can also hide it or hit the "Dup" button to make a duplicate.
  4. while you can use the "Drag On" button to toggle a "ball" in the middle of the PNG image so you can drag it around your scene, or hit the button beside it to show some positioning tools, this method may not be the most ideal way to move your placed PNG sometime. Clicking on the "Click Select On" allow you to select the placed PNG by clicking it on your scene. It also shows a boundary edge so you can use this to tell where is the placed PNG in case you lost it. But the most important tool here is actually on the button we well explain further later.
  5. normally you would want to click the "Fix Rot" button so it's rotation isn't bound to your camera view.
  6. changing the shader will change how the in-game lighting affect the PNG image. "unlite" means it always display like the real picture with no shading. If you want the game's lighting to affect the image, change to "lite".
  7. these are the various sliders you can use to scale, rotate, adjust color of the image
  8. reload PNG, this will also scan for new images you added in the folder. The location where you want to place your images is - COM3D2\Sybaris\UnityInjector\Config\PngPlacement - you might want to pin this to Windows' Quick Access or shortcut it somewhere for easy access.
  9. the delete button

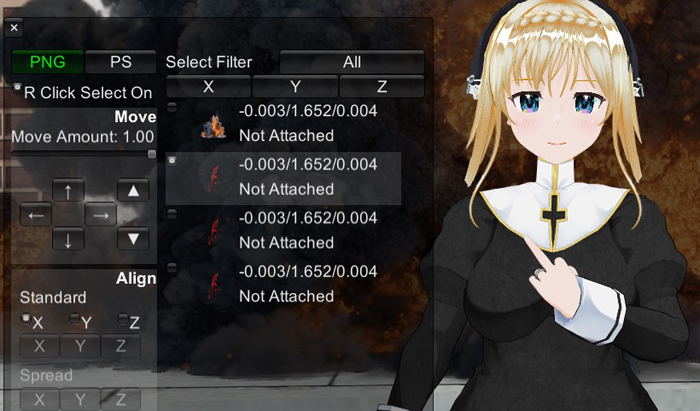
This extra panel is accessed by hitting the  button. This is the method I primarily uses to move PNG images around the scene as it is faster than the ⇔ buttons on the original page.

Notice that on this page, images aren't deselected automatically when you pick another image. If you want to move a different item, make sure to deselect the other ones first. But this also means, you can select multiple images and move them at the same time.

The "Move Amount" slider control the speed of movement. Then use the arrow buttons on the interface to move the images around the scene. Do note that, these arrow buttons correspond to the WORLD's position, not your camera position. What that means is, clicking on going left, will go left of the WORLD; not the left of your camera... This may get a little confusing if your camera position isn't pointing to the default direction.


Finding PNG images

You can simply just add "PNG" on your search parameter and Google / whatever search engine will give you PNG images with transparent background.


The way you can tell if the background is truly transparent is, when the image finish loading it will show checker-board pattern behind. However, if you see checker-board on the small thumbnail, it's FAKE BAIT and don't bother with it.

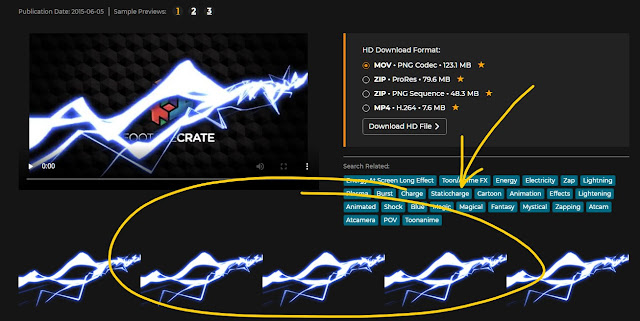
Here is a website I find to have some interesting images you can use. Technically they sell animated visual effects, but you can find tons of PNG static images you can use here https://vfx.productioncrate.com/ .

At the bottom of the detail page you will find the static PNGs you can use.

LUT LUT LUT LUT

Yes, COM3D2's vanilla graphic visual may not be the best, often looks quite 'rigid'. That's why we want to use LUT (Look up Table) to give our shots some color filters.

If you just making a "studio style" photoshoot you likely won't need a LUT, in most cases a boost in Vibrance is enough. But if you making some very unusual shots not original intended by the game, you likely find yourself in a situation where the color of things just looks like utter crap.

In previous article I already walk through method of creating your own LUT collection, as well as linking to my own set of ReShade LUT collection.


In the scene above. The first image is the original poses and prop placed by SceneCapture. Second shot shows the original color without any adjustment and LUT - the color is really all over the place.

The last shot shows the usage of LUT, instantly transform the mood of the scene into something else more fitting of the scene.

Normally, if I need a LUT for the scene, the process is as follow:

  • make some basic poses and object placement for the scene, don't need to be accurate yet
  • find & save a suitable camera position for the scene
  • find a suitable LUT for the scene, don't worry if there are some minor dissatisfaction with certain color
  • use qUINT Lightroom to further fixes some specific color problem. Let say if you don't want the blue color in your scene, you can completely eliminate blue color with the sliders under "Palette" section of the shader.


  1. The "Palette" section contain sliders for specific color ranges. You can change these color in your scene if you don't like how they looks originally. "Hue" will swap the color with a different color tone. "Exposure" is the brightness of it. "Saturation" is pretty self explanatory.
  2. The "curves" section have various individual controls for the bright spot and dark spot of your scene. For example, if you find the black area of your scene are too black and you cannot see the details, you can try raise the "Black Curves" or "Shadow Curves".
  3. The "Color & Saturation" section is quite self explanatory. You can also change the temperature, colder or warmer, or add color tint to your scene.
  4. The "Vignette" section give you various sliders to adjust the size and vignette intensity for your scene.


//--

Table of content:

  1. Setting up ReShade & configuration 
  2. Explaining depth detection, Depth of Field (DoF), Fog effect & Screenspace RayTracing Global Illumination (RTGI)
  3. Other commonly used shaders (updated 29/9/2021)
  4. Random Tips ◀ you are here  (added 20/9/2021)

Saturday, September 18, 2021

ReShade Setup for COM3D2 (or any games really)

This article goes through setting up ReShade, explain how to acquire extra shader effects, and example use cases for several commonly used shaders.

This is written with Custom Order Maid 3D 2 (COM3D2) in mind, though technically this works for practically any games, and I will also uses other games as use cases example.

Table of content:

  1. Setting up ReShade & configuration ◀ you are here
  2. Explaining depth detection, Depth of Field (DoF), Fog effect & Screenspace RayTracing Global Illumination (RTGI)
  3. Other commonly used shaders (updated 29/9/2021)
  4. Random Tips (added 20/9/2021)
Got question? Shoot me a whisper/private message on Discord, username NameInvalid#3419 or KUZU ⩌.⩌ on Custom Maid Server.

But first, let's talk about one major downside


The in-game "screenshot scaling" function will not work with ReShade. If you want to capture 4K you need to run the game at 4K (AND NO DESKTOP SCALING!!!). Don't have a 4K monitor? No problem, solution at the bottom of this article.


COM3D2 Plugin you need to REMOVE

The "Graphic Setting" plugin is interfering with ReShade causing it unable to detect depth map correctly. Frankly that plugin feels a bit broken anyway, please remove it - bepinEx/plugins/graphicsetting.dll


Setting up ReShade

https://reshade.me/

Acquire latest ReShade version from official ReShade website above & run the downloaded executable. Browse for COM3D2's exe, any one of them are fine. DirectX should be selected, click on it to confirm.


Next you will be prompted to download a bunch of shaders from various collections. If you feel adventurous and want to check out what every one of them does, you can grab them right now. Otherwise you can also download them later manually from Github. Do note that installing a lot of shaders will make ReShade starts & reload slower.

For now just grab everything from SweetFX & qUINT packages. Make sure they are ✅ marked. I leave a link down below for all the packages if you want to download them later.


All Github shader packages: SweetFX, qUINT, prod80 shaders, Depth3D, AstrayFX, OtisFX, Brussell shaders, Daodan shaders, Fubax-shaders, Insane-shaders, luluco250 shaders, CorgiFX, Radegast shaders. In most cases the author does explain what their shader does on their Github description. To manually download their packages, simply download the code as zip file.


Understanding ReShade files & folder

After ReShade done installing, it will create several files and folders in your game's primary directory (where the selected game exe located).

  • ReShade.ini : this is the main configuration file for ReShade, here it lists the directory where the shaders are stored, keyboard shortcut, and more.
  • dxgi.dll & dxgi.log : this is the DLL file that hook ReShade onto a game, different graphic API will uses different DLL files. If ReShade didn't work when you boot up into a game, you likely just picked the wrong graphic API.
  • "reshade-shaders" folder : this is where all the shader effect files are stored. Shader files are all in the format of "fxh" or "fx" and they are stored in the "shaders" subfolder. Some shaders also uses textures which stored in the "textures" subfolder. Manually installing shaders simply by placing the shader files in these folder.
  • DefaultPreset.ini or ReShadePreset.ini: after you first boot up your game, a default preset file will be created. This is where it stores all the shader effect configurations.

Just for reference, DirectX9 game uses d3d9.dll, other DirectX uses dxgi.dll and OpenGL game uses opengl32.dll. Vulkan dont place dll in game directory, instead in C:/progam data/reshade/. To uninstall ReShade from a game, simply remove related files mentioned above and the dll. 


Configuring ReShade

Upon first time booting up, you will notice a ReShade header overlay telling you to hit the 'Home' key to activate the configuration panel. If for whatever reason you don't have a 'Home' key... you can always just use On Screen Keyboard (OSK) to do so, simply hit Windows's Start > type "osk" to search and you will see that Windows utility.

You are offered a brief tutorial, follow through if you want.


The first thing we wanted to do is change the shortcut key bindings. As COM3D2 & plugins does uses a lot of keys. 'Home' key in particular is used by Camera Utility plugin, so you want to assign ReShade onto something else to avoid clashing.


  1. "Home" is where you will toggle & adjust various shader effects.
  2. "Settings" is where we configure various ReShade system settings.
  3. if somehow a shader failed to load, you can refer "Log" page for troubleshooting.
  4. this is the page where we configure "depth-map" detection. We will talk about depth-map later.
  5. we want to assign shortcut keys for three of the functions: overlay, effect toggle and effect reload. We don't use "performance mode" much (which disable all shader slider adjustments) so just ignore that one. Assign them with key not already used by COM3D2 and plugins. Personally just use the dash (-) key for all three, you can add Ctrl Shift & Alt modifiers. Use anything comfortable for you.
  6. Normally we set "Input Processing" to "block all", so when you messing with ReShade, you don't accidentally click/adjust anything of the game.
  7. Set shortcut key and location to store screenshot.
  8. "Group effect files with tabs" is highly recommended to be enabled. Otherwise the sliders of various shader effects enabled will become a really long annoying list to scroll.
  9. if you having hard time reading ReShade's UI you can always change the font size here, as well as changing it's style & look.


  1. this is where you select different presets.
  2. you can use the + icon to create a new preset. Do note that the preset file isn't created until you enabled any first effect.
  3. this is the list of installed effects. Tick the checkbox to enable it.
  4. enabled effects will be shown as tab here if you enabled "Group effect files with tabs", otherwise you just get a single page continues long list here.
  5. "Edit Global preprocessor definitions" have something to do with "depth-map", we talk about it later.
  6. every shader effect will have it's own "reset all to default" button.


The order of the shader matter! Shader below will affect the shader above it, while shader at the top will not take into account of the effects below it. You can order the shader list by simply drag and drop.

Ordering example:

  • do you want your LUT to affect Adaptive/Canvas Fog? If not, then put LUT before Fog.
  • in most cases you probably want color correction shader like qUINT Lightroom to be at the bottom so it affect the overall visual.
  • anti-aliasing (AA) shader are probably better at the bottom as well, so it fixes up any aliasing problem caused by depth shaders like fog & DoF

Installing or Removing shader effect files

You don't need to quit or restart game in order to install new shader file or remove existing one. All you need to do is add or delete the files in reshade-shaders folder, and hit the "Effect Reload" key which you should be assigned earlier. This will reboot ReShade completely without the need to game restart. Any new shaders will be loaded - and if there is any problem with the new shader file you just added, there will be a row of red error message on top of ReShade UI.

  • if the error says missing "_____.fxh" file, you simply is missing a required shader file, fins that fxh file and place it in the "shaders" subfolder, then reload ReShade again with the "Effect Reload" key.
  • syntax error however is harder to troubleshoot, sometime it just meant outdated shader file no longer compatible with current version of ReShade.


❗❗❗ Capturing screenshot at 4K

The in-game's "screenshot scaling" function don't work for ReShade, that is one down side of it. So in order to capture at higher resolution, you literally need to run the game at 4K (or higher).

Don't have a 4K screen? Just turn on nVidia DSR or AMD VSR, both allows you to output much higher resolution than what your monitor can actually support. Assuming your graphic card isn't too old to support 4K DSR/VSR output of course. On the side of AMD, you need to have at least R9 290X or newer to support 4K-VSR, otherwise you are limited to 1440p only.

However, one quirk with COM3D2 is that, if you not setting your desktop scaling to NONE (100%, no resize), then the game will not render at true 4K. Instead it will actually render at lower resolution. Make sure to set desktop to no scaling! And RESTART the game after change scaling, otherwise the result would be horrendous, even if the capture is in 4K resolution, the quality just isn't if you don't restart.

Several of the COM3D2 mod plugins also do not support any sort of UI size adjustments, and they will appear pretty small in the game when playing in 4K. For example the PartsEdit plugin. Well, there's nothing we can do about that so far.

Additional note for nVidia driver : set "DSR Smoothing" to 0%.


//--

 ▶▶ JUMP TO NEXT PAGE ▶▶

Table of content:

  1. Setting up ReShade & configuration ◀ you are here
  2. Explaining depth detection, Depth of Field (DoF), Fog effect & Screenspace RayTracing Global Illumination (RTGI)
  3. Other commonly used shaders (updated 29/9/2021)
  4. Random Tips  (added 20/9/2021)


ReShade : Other Commonly Used Shaders

Table of content:

  1. Setting up ReShade & configuration 
  2. Explaining depth detection, Depth of Field (DoF), Fog effect & Screenspace RayTracing Global Illumination (RTGI)
  3. Other commonly used shaders ◀ you are here (updated 29/9/2021)
  4. Random Tips  (added 20/9/2021)
Got question? Shoot me a whisper/private message on Discord, username NameInvalid#3419 or KUZU ⩌.⩌ on Custom Maid Server.


This page list out some shaders I commonly uses. Which includes:

  • qUINT Lightroom : this shader offer a lot of color adjustment options, you practically almost don't need any other color adjustment shader anymore with this one. Like it's name suggest, it tries to simulate the functionalities provided by Adobe Lightroom, which is a photography editing software.
  • Chromatic Aberration (prism.fx) : the differences between this CA shader compared to others is, it only affect the edges and not center of the image. This is important to make your subjects don't become fuzzy.
  • Clarity : this is a simple shader to enhance contrast of certain element in your scene. Normally just enable and done.
  • MMJ's Cell Shader : this is another shader that you likely won't find it in any Github packages. Here is the original link. For your convenient you can just download this fx file and put it inside "reshade-shaders/shaders/" folder. This is a simple to use cell-shading or "toon" effect shader.
  • Multi LUT : Look Up Table, or LUT for short, is a set of data that tells the game/program what color it should replace that specific tone with. All those photo filters you use on phone apps, those are basically LUT. Multi LUT have a list of selectable LUTs and also convenient slider to adjust it's intensity.
  • FXAA : from the SweetFX package, just to add a bit more anti aliasing to the game. Despite cranking to 8X in COM3D2, it still isn't appear that great.

and... many more example see further below.


Multi LUT

You can find my custom Multi LUT collection here (updated 29 Sept 2021):
https://www.mediafire.com/file/qs3b7z3zht2whvv/custom+multi+LUT+29+sept+2021.zip/file

  • "The LUT to use" select one from this list
  • "LUT chroma" refer to how much the selected LUT should affect the color of the visual
  • "LUT luma" refer to how much the selected LUT should affect the brightness / contrast of the visual
My LUT example (click to see larger picture). Most of these LUTs are very extreme with very specific purpose/mood, may not want to use them at full intensity depending on the scene.


Example effect of some shaders

The following section are screenshot of effects from various shaders to give you an idea of what they do. Link included, if there is no link that means they can be acquired from this repositoryhttps://github.com/Mortalitas/GShade/ for convenient purpose. Of course you can also acquire them from their original author's GitHub or official ReShade Github.

Install process:

  • download the repository files by hitting the green "Code" buttion > download ZIP
  • extract it somewhere else (not directly into the game folder, there are too many shaders in there!)
  • pick and choose only shader effect file you want, copy them into COM3D2/reshade-shaders/shaders/
  • if upon reloading ReShade and you get error loading the newly added shader file, check the log see if you missing any pre-requisite files

While many of these effect appear to be rather simple by them self, it is possible to utilize them in creative way to achieve great / weird effects. They are just like Photoshop filter effects, by them self alone maybe it didn't do anything interesting; but when used it in a complex workflow you can use it to achieve interesting results.

Extra note: it is possible to have multiple copies of the same shader effect by simply making copies of the shader FX file and give them different names.

//--

  • MMJ's Cell Shader : one of many many other cell-shading / toon effect. I prefer this one simply because of it's simplicity.
  • Display Depth : mainly just used to check if depth detection is setup correctly. But you can also use the depth map for other purposes outside of the game.
  • Adaptive Fog : single color fog where you can adjust distance from camera, color & opacity.
  • Prism.fx (Chromatic Aberration) : this chromatic aberrations shader only affect the edge and not the center of the image so your subject won't become fussy
  • RTGI (this isn't free) : Screenspace RayTracing Global Illumination, adds ambient occlusion (soft shadow) and light bounce effect, particular useful for older games to improve lighting. The debug view allows you to check and adjust intensity of the effect to suit the scene.
  • Atmospheric Density : another fog effect but this one is much more advance and appear a lot more 3D than Adaptive Fog. Also have the ability to scatter lights like a proper fog should do.
  • PKD FlatShade : yet another cell-shade / toon shader effect.


  • PPFX Godrays : light shaft effect, horizontal & vertical position can be adjusted.
  • Posterize : poster effect, color can be adjusted.
  • TiltShift : simple edge blurring effect, angle and intensity can be adjusted.
  • Canvas Fog : a more advance version of Adaptive Fog, allows two color blending of various different shape, angle, overlay mode, etc.
  • qUINT SSR : Screenspace Reflection, adds reflection effect to flat surfaces.
  • Spotlight : add spot of light, distance from camera can be adjusted, as well as changing color & intensity.
  • Backdrop (pkd_Backdrop) : a quick shader to cut off background from specify distance with solid color. Two different colors can be assigned.
  • RimLight : strange lighting effect.


  • Directional Depth Blur : motion blur effect where you can specify the distance of it's effect from camera, aside from it's intensity.
  • qUINT DoF : Depth of Field effect with bokeh capability.
  • TinyPlanet : round and round and round we go...
  • VHS Pro : VHS tape effect. VHS is the old school bulky home video tape.
  • Retro Neon : another strange effect
  • Pixelate : censor your game for whatever reason
  • Glitch : break your screen for whatever reason
  • CRT : simulate old school CRT monitor scanline effect


  • Nostalgia : simulate color of various old school gaming console devices. Works better on bright colored scene instead of dark scene though.
  • Mesh Edge : show edges. Not sure why you want to use this when SceneCapture also have this function and more customizable. But might be useful for other games.
  • Gravity : strange pixel falling effect.
  • Aspect Ratio Composition : allow display of grid & letterbox to help composition / subject positioning
  • qUINT Bloom : a rather soft bloom effect
  • qUINT MXAO : ambient occlusion effect, also came with a debug view 


(advance) Creating your own LUT collection

It's not exactly super hard to create your own custom LUT collection, I walk through the steps below.

But the first hurdle is actually getting your LUT file. If you searched around online you will ended up with files like .cube, .3dl, .look.... they aren't PNG. These are the preset files for various softwares. But we actually need PNG file to be used in ReShade or SceneCapture.

Personally I'd prefer to get LUT which makes extreme changes to the visual. Because we really can just do minor tweaks with shader like qUINT Lightroom instead of hassle using LUT... Extreme one are the likes of this one: https://freshluts.com/luts/871

If you don't own Photoshop don't worry, you can do the same in https://www.photopea.com/

First we need to create our LUT tiles

Fortunately ReShade already give us a vanilla unmodified LUT tile you can find in - COM3D2\reshade-shaders\Textures\lut.png - the process is slightly different depending on the software you use:

Photoshop:

you want to put your downloaded LUT preset .cube file in - Adobe Photoshop CC 2019\Presets\3DLUTs - or whatever version you uses and wherever you install it. Then start or restart Photoshop. Open the lut.png provided by ReShade

Create a new layer > "Color Lookup...", under the list of "3DLUT File" you should find the .cube file you added earlier. Now you have successfully applied the LUT preset onto that image. Save it as a new PNG file somewhere.

PhotoPea:

Very similar process, except you need to load the cube file manually into the program.


How to utilize this LUT tiles?

If you intend to use this LUT tile with SceneCapture, simply place them in - COM3D2\Sybaris\UnityInjector\Config\SceneCapture\LUTs

If you intend to add them to ReShade, preferably into the MultiLUT shader so you have a list to pick from, go through the process below.

This is an example MultiLUT PNG texture used by ReShade. It's simple really, each row is a different LUT, you can add more rows as much as you want, as long as you program the amount correctly in the MultiLUT script file.

To not overwrite the existing Multi LUT shader file let's give it a different name and different texture name as well. Make a copy of existing "MultiLUT.fx" and call it something else, for example "My MultiLUT.fx"


  1. this point to the PNG texture file inside "reshade-shaders/textures/" folder. Use a different name for your own collection.
  2. this is the pixel size of per square of the LUT. Use whichever value depending on the LUT image you created. The one provided by ReShade is 32
  3. this refer to the amount of tile each LUT have, again it depends on the LUT texture you created. The one provided by ReShade is 32
  4. this refer to how many rows of different LUT are in the whole PNG image. My LUT PNG texture have 25 LUT rows, so I put 25 here. Do not screw up any of these numbers, otherwise you will get broken visual effect in-game. Make sure to count correctly!
  5. this is a list of all your LUT names, each saperated by " \0 " - that's a zero, not O. If the amount of LUT listed here didn't correspond to the amount on fLUT_LutAmount you gonna have problems.

To help you edit & position the LUT texture correctly, make sure to setup your image editor's grid to the correct pixel. Don't forget to make sure your canvas size is wide enough to fill all the LUT tiles! For example, a LUT of 64 pixel in TileSizeXY with 64 total TileAmount means it have an image width of 4096 pixel.


 ▶▶ JUMP TO NEXT PAGE ▶▶

Table of content:

  1. Setting up ReShade & configuration 
  2. Explaining depth detection, Depth of Field (DoF), Fog effect & Screenspace RayTracing Global Illumination (RTGI)
  3. Other commonly used shaders ◀ you are here (updated 29/9/2021)
  4. Random Tips  (added 20/9/2021)


biz.